Implementing the ordering lifecycle
Note:
The Lightspeed Ordering is in its Alpha phase of development. The documentation on this page and some of the webhook features are not available yet.
- Are webhooks something you'd like to see? Please send us an email at [email protected]
This guide runs through a basic ordering integration.
Introduction to Ordering primitives
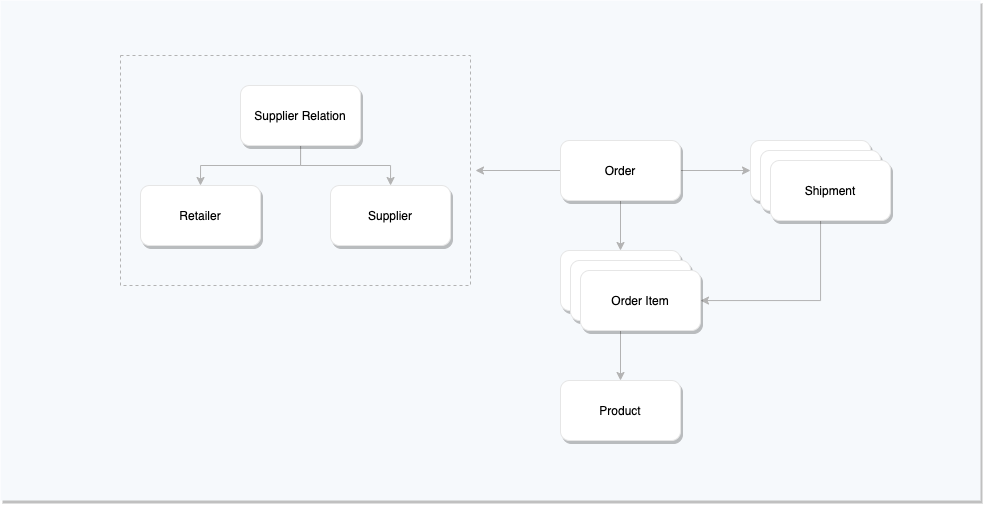
Use these core primitives to express your business model on Lightspeed Ordering.

- A Retailer is a buyer. Retailers have a unique ID, an email address and shop location.
- A Supplier is a seller. Suppliers have a unique ID and an email address.
- A Product is what the supplier sells. Products represent goods or services.
- An Order is a retailer’s request to purchase one or more products from a supplier.
- An Order Item is a product which a retailer has requested to purchase
- A Supplier Relation is a relationship between a supplier and retailer.
To successfully build a ordering service integration you will need to implement the following ordering lifecycle scenarios:
Implementing a customer signup flow
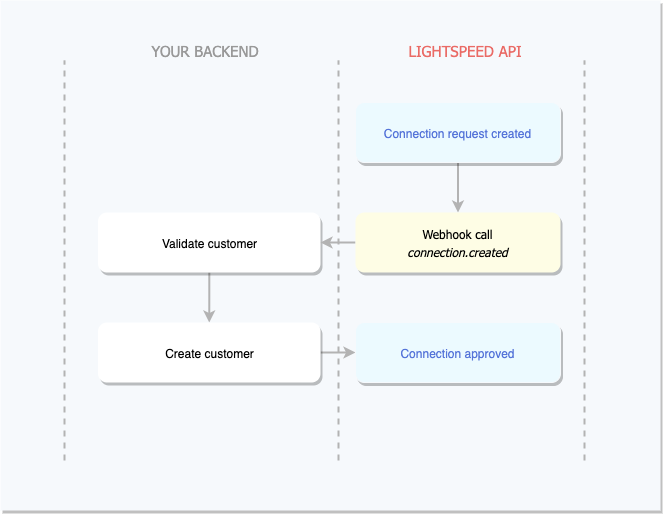
Before a retailer can order goods and services from a supplier, they must first establish a connection with a supplier. Use this session to validate and create the customer in your backend, then complete connection request through a set of API requests to Lightspeed from your backend.

Step 1: Validate customer
Have your applications back-end then validate the incoming customer, this process could also involve manually reviewing the request on your front end.
Set up a webhook endpoint and listen to the customer.created to be notified of new customers. This webhook endpoint will return an Relation:
{
  "id": "e89dbbc4-105c-11ea-987d-acde48001122",
  "status": "Pending",
  ...
  "supplierID": "e89dbbc4-105c-11ea-987d-acde48001122",
  "retailerID": "478116eb-18d7-4f52-951c-cb54643a4e0b"
}
Step 2: Approve/Decline customer
After collecting the required validation information for your customer, its time to either approve or decline the relationship with the customer. Begin by approving/declining the customer in Lightspeed:
curl --location --request PUT 'https://lsapi-supplier-orders.lightspeedappstg.com/suppliers/relations/$RELATION_ID
--header 'Content-Type: application/json
--header 'Authorization: Bearer $LIGHTSPEED_API_TOKEN
--data-raw '{
	"status": "Approved"
}'
Which will return an Approved relationship,
{
  "id": "e89dbbc4-105c-11ea-987d-acde48001122",
  "status": "Approved",
  ...
  "supplierID": "e89dbbc4-105c-11ea-987d-acde48001122",
  "retailerID": "478116eb-18d7-4f52-951c-cb54643a4e0b"
}
In the next section, we will explore how your application can handle new orders being created by retailers.
Handling new submitted orders & ordering lifecycle
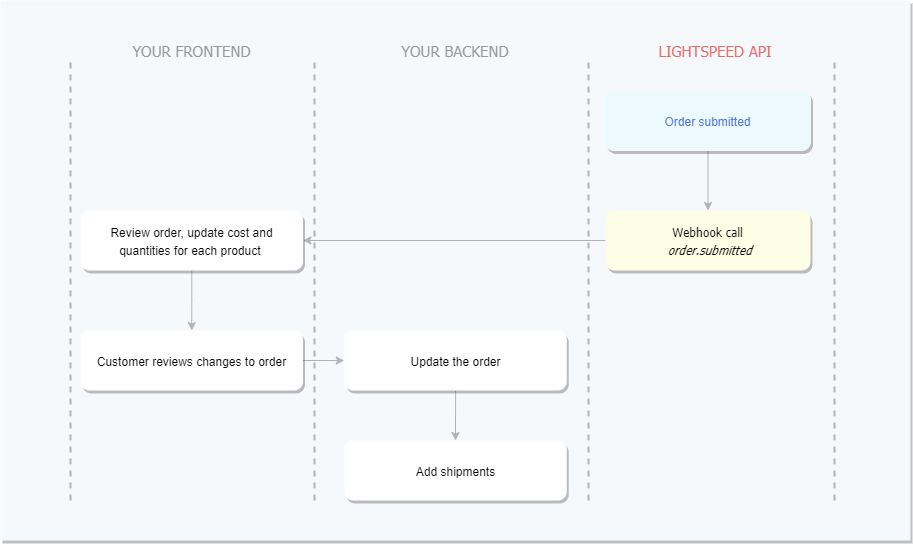
In this section, we will explore the ordering life cycle, we look at how to handle orders that get submitted by retailers, creating shipments and finalizing an order.

Step 1: Review Order
Once an order has been submitted by a customer, you will need to review the order in your application to ensure it can be full-filled and the appropriate pricing is set for each product. By default, defaultCost will be used if no cost is set.
Set up a webhook endpoint and listen to the order.submitted to be notified of newly submitted orders. This webhook endpoint will return an Order:
{
  "createdBy": "280981",
  "createdDate": "2020-02-11 22:11:24",
  "id": "70fe4392-4d1b-11ea-81e8-ba88c8889bb5",
  "modifiedDate": "2020-02-11 22:11:24",
  "orderDate": null,
  "orderDeliveries": null,
  "orderStatus": "OrderOpened",
  "orderedItems": [
    {
      "id": "70fe43ed-4d1b-11ea-81e8-ba88c8889bb5",
      "productID": "35ef9dea-f73d-11e9-80f3-d7e78880ed20",
      "orderID": "70fe4392-4d1b-11ea-81e8-ba88c8889bb5",
      "status": "OrderItemOpened",
      "quantity": 5,
      "received": 0,
      "cost": 10.50,
      "totalCost": 52.5,
      "createdBy": "280981",
      "createdDate": "2020-02-11 22:11:24",
      "modifiedDate": "2020-02-11 22:11:24"
    }
  ],
  "otherCost": null,
  "percentageDiscount": null,
  "publicNote": null,
  "reference": null,
  "retailerNote": null,
  "shippingCost": null,
  "subtotal": 52.5,
  "supplierRelationID": "91de599d-0bdb-11ea-b62a-e2a56385c802",
  "totalCost": 52.5,
  "totalQuantity": 5
}
Fields such as
totalCostare automatically calculated on the fly by Lightspeed. There is no need to manually update these fields.
Additionally, you may want to set a specific pricing for this specific customer. You can update the cost of the order items by Updating order items in Lightspeed.
Step 2: Customer reviews changes to order
After modifying the order in your application, the retailer will be directed to your B2B website to review. It would be good practice to visually display order changes to the customer through your application and ask them confirm before proceeding.
Step 3: Update the order
In this step, after the retailer has signed off on the final changes, your application should save the state of the order and Update an Order in Lightspeed.
Updating the cost of an order item:
# Using the ID from the Order Item in the "orderedItems" array.

curl --location --request PUT 'https://lsapi-supplier-orders.lightspeedappstg.com/orders/$ORDER_ID/items/$ORDER_ITEM_ID' \
--header 'Content-Type: application/json' \
--header 'Authorization: Bearer $LIGHTSPEED_API_TOKEN \
--data-raw '{
  "cost": 5
}'
After completing this flow, your back-end should call update order endpoint to change the status of the order to OrderProcessing. The OrderProcessing state indicates to the your customer that you are preparing the order for shipment and the pricing is finalized.
curl --location --request PUT 'https://lsapi-supplier-orders.lightspeedappstg.com/orders/$ORDER_ID
--header 'Content-Type: application/json
--header 'Authorization: Bearer $LIGHTSPEED_API_TOKEN
--data-raw '{
    "orderStatus": "OrderProcessing"
}'
Step 4: Create shipments
When your order is ready for shipment, its time to create the shipment in your application and then persist the shipment details to Lightspeed. Begin by shipping an order:
## Update call
curl --location --request POST 'https://lsapi-supplier-orders.lightspeedappstg.com/orders/$ORDER_ID
--header 'Content-Type: application/json
--header 'Authorization: Bearer $LIGHTSPEED_API_TOKEN
--data-raw '{
    "orderStatus": "OrderProcessing"
}'
Which will return an OrderDelivery:
Partial Order Fulfillment
Now that you've created your first shipment, you may continue to create shipments in order to fulfill the rest of the order.
Step 5: Completing the order
Once all outstanding shipments have been full-filled and your customer has received the goods or services, the order may now be moved into Completed state. Begin by completing the order in Lightspeed:
curl --location --request PUT 'https://lsapi-supplier-orders.lightspeedappstg.com/orders/$ORDER_ID
--header 'Content-Type: application/json
--header 'Authorization: Bearer $LIGHTSPEED_API_TOKEN
--data-raw '{
    "orderStatus": "OrderCompleted"
}'
Congratulations! You completed our basic ordering integration guide. Next, you might want to learn more about the ordering workflow or how to add shipments.
Updated almost 6 years ago
